This month, I’m entering retirement. I’ve been writing software for over 4 decades and since 2017 it’s been almost exclusively spent customizing NetSuite. My time with NetSuite started out somewhat rocky. In fact my very first blog article was a scathing rebuke of the NetSuite platform and support. As I retire, I’d like to bookend with this. It is my pleasure to report good things about NetSuite.
I find NetSuite incredibly extensible. As a developer, you are free to write your own single page apps, meaning you can inject custom pages anywhere in NetSuite. I like writing “modules” comprised of a Suitelet (the page), an HTML file for any statically defined markup, a Restlet (AKA restful API), often times I include a module-specific library, and finally a client script. This offers a clear separation of concerns. You can create your own data tables, custom record types. You can add custom fields to existing records. You can form your own relationships (parent-child) between all types of records. The sky is the limit!
I really like the selection of JavaScript for both server side and client side code. Over the years, the platform has progressed through SuiteScript 1.0, 2.0 and most recently 2.1. SuiteScript 2.1 is JavaScript ES6, which makes it closely compatible with the latest browser supported JavaScript. Many platform-specific methods are available on the server side and client-side. A call to search.lookupFields() works in a Suitelet, Restlet, or Client Script. A JavaScript method like Array.sort() works in server or client code. Unlike other platforms, where a developer might be writing C# on the server side and JavaScript on the client side, NetSuite reduces complexity by standardizing on one language and one set of platform-specific methods.
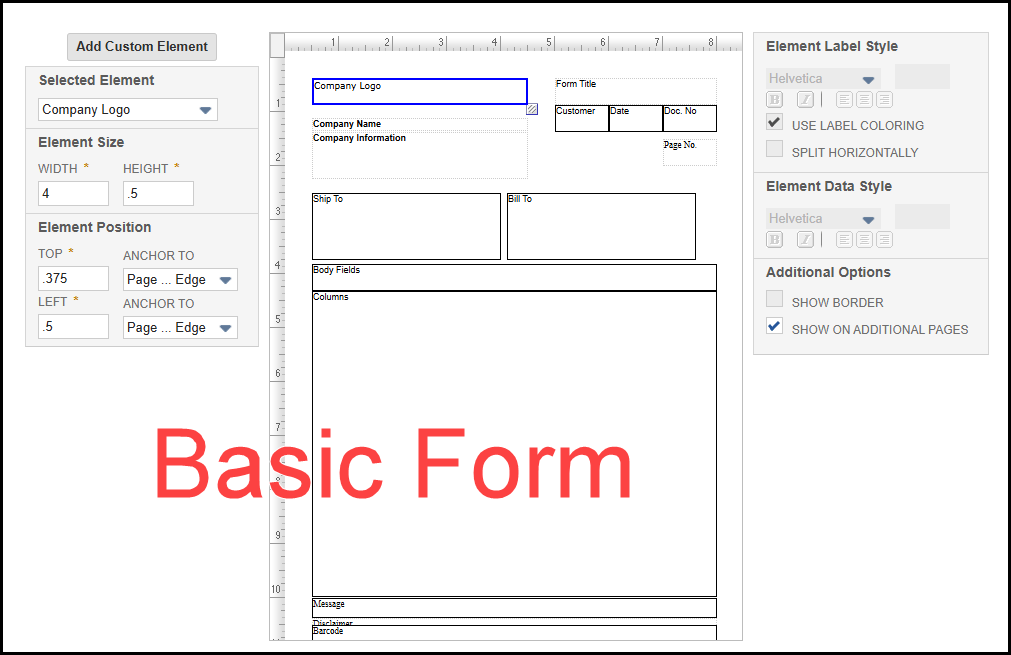
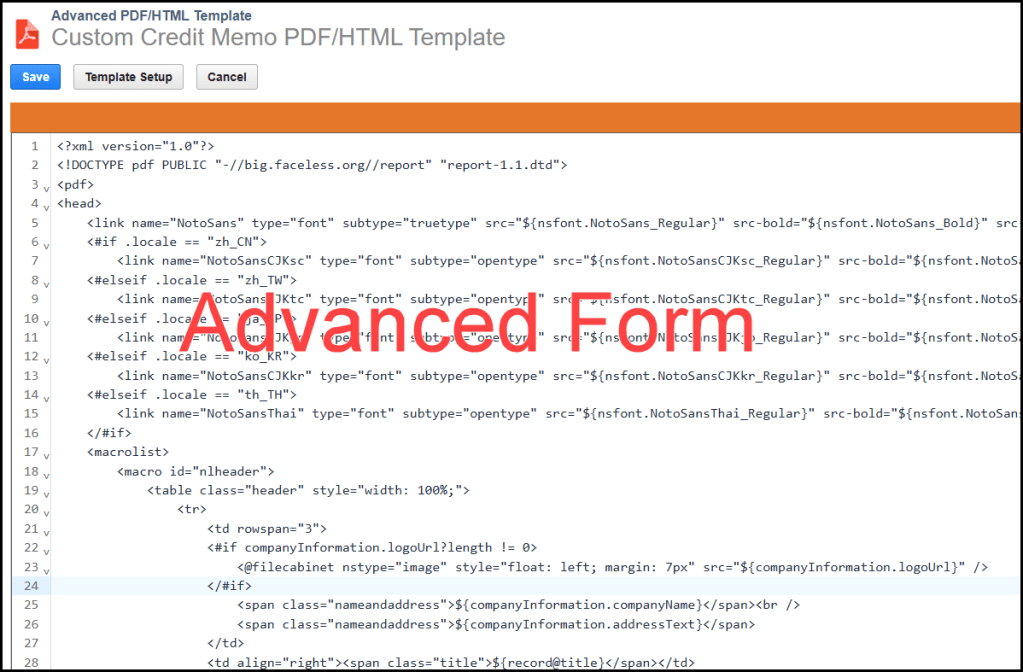
There are many standard reports, but you also have the option of writing saved searches, which can be printed much like a report. Printed transactions, like Estimates, Sales Orders, Invoices, Pick Tickets, Purchase orders, etc. can be customized in 2 ways. You have the option of using a non-developer basic form. Or you can have someone like me customize an Advanced HTML/PDF Template, which is a combination of HTML and Freemarker templating language.
NetSuite offers developers the option of creating background tasks, like Schedule Scripts. If a Scheduled Script becomes too needy and is monopolizing server-side resources, there’s the option of breaking it up into multiples tasks via a Map/Reduce Script.
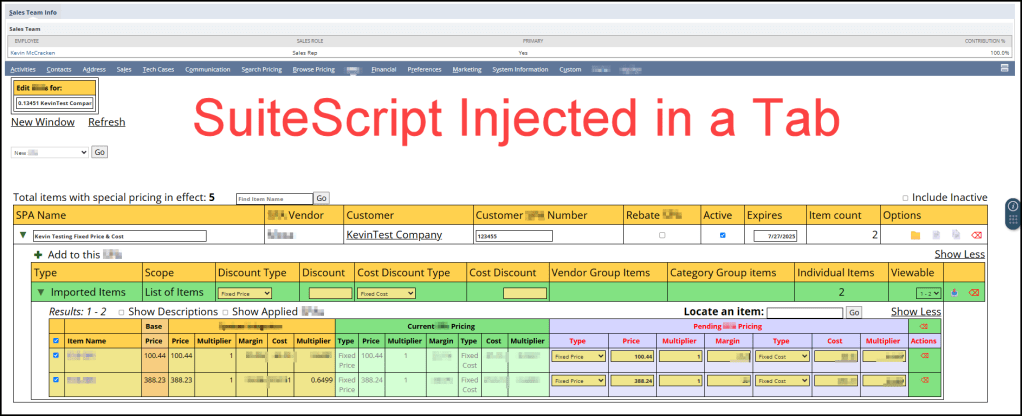
A developer can inject custom code into a standard form, like viewing or editing a sales order. This is done through User Event Scripts and custom fields. Its even possible to commandeer a section of a standard form, like editing a sales order and injecting a single page app into a section of that form. Basically the sky’s the limit!
I’ve rambled on enough. In summary: I love working with NetSuite and I love writing JavaScript. And, I wanted to give NetSuite some love now that I’ve worked with it for over 8 years. To NetSuite’s credit, they’ve come a long way in a positive direction regarding both platform and support. If you are not a NetSuite customer, it’s worth a look!
I’ll also end with this shameless plug. I am retiring, but I’d kind of like to keep working with NetSuite. If you need any part time help, or want advice on a project, feel free to contact me. I updated the About page with more info about me. Hit the Contact page or comment on this post if you want to get in touch with me. I’ll still be around.
jQuery autocomplete is a powerful tool that can be overlooked or underutilized. Here is an example that demonstrates not only how jQuery autocomplete works, but some of its hidden potential.
In this example I demonstrate applying the contents of multiple HTML controls to filter results of a single textbox’s autocomplete results. Here is what it looks like in action.
My data is articles of clothing. A garment’s category only includes ‘tops’ and ‘bottoms’. It’s pretty sparse for an autocomplete example, but you get the idea.
My example includes the following scripts: Suitelet, Restlet, Client, and an HTML file. The JSON file takes the place of a database. I created my JASONized data using vsCode’s Copilot. That’s a handy tip!
Here is the HTML file’s contents.
<label for="filters">Additional Filters</label><br />
<div id="filters" style="border: solid 2px blue; background-color: lightblue; padding: 10px; width: 40%;">
    <table>
        <tr>
            <td><label for="garment_type">Garment Type:</label></td>
            <td><label for="garment_color">Garment Color:</label></td>
            <td><label for="garment_size">Garment Size:</label></td>
            <td><label for="garment_manufacturer">Garment Manufacturer:</label></td>
            <td><label id="hover_sku_heading" style="display: none;">SKU:</label></td>
        </tr>
        <tr>
            <td><select id="garment_type" name="garment_type">
                    <option value="">-- Select Type --</option>
                    <option value="shirt">Shirt</option>
                    <option value="tank">Tank</option>
                    <option value="sweater">Sweater</option>
                    <option value="pants">Pants</option>
                    <option value="shorts">Shorts</option>
                </select></td>
            <td><select id="garment_color" name="garment_color">
                    <option value="">-- Select Color --</option>
                    <option value="blue">Blue</option>
                    <option value="gray">Gray</option>
                    <option value="black">Black</option>
                    <option value="kakhi">Kakhi</option>
                </select></td>
            <td><select id="garment_size" name="garment_size">
                    <option value="">-- Select Size --</option>
                    <option value="Small">Small</option>
                    <option value="Medium">Medium</option>
                    <option value="Large">Large</option>
                    <option value="XL">XL</option>
                    <option value="30x32">30x32</option>
                    <option value="32x32">32x32</option>
                    <option value="34x32">34x32</option>
                    <option value="36x32">36x32</option>
                    <option value="34x30">34x30</option>
                    <option value="36x34">36x34</option>
                </select>
            </td>
            <td><select id="garment_manufacturer" name="garment_manufacturer">
                    <option value="">-- Select Manufacturer --</option>
                    <option value="LL Bean">LL Bean</option>
                    <option value="Polo">Polo</option>
                    <option value="Ralph Loren">Ralph Loren</option>
                    <option value="Levi's">Levi's</option>
                    <option value="Wrangler">Wrangler</option>
                    <option value="Fruit of the Loom">Fruit of the Loom</option>
                </select>
            </td>
            <td></td>
        </tr>
        <tr>
            <td id="hover_type"></td>
            <td id="hover_color"></td>
            <td id="hover_size"></td>
            <td id="hover_manufacturer"></td>
            <td id="hover_sku"></td>
        </tr>
    </table>
</div><br />
<br />
<label for="garment_id">Unique ID (can be a hidden field):</label><br />
<input type="text" id="garment_id" name="garment_id" placeholder="SKU" disabled /><br />
<br />
<label for="garment_category">Garment Category (with autocomplete):</label><br />
<input type="text" id="garment_category" name="garment_category" placeholder="Type either 'top' or 'bottom'" /><br />
<br />
<p>
    This demonstrates the use of the <strong>jQuery autocomplete</strong> feature in a NetSuite Suitelet.
    Key takeaways include:
    <ul>
        <li>Incorporates additional filters beyond a textbox control (Type, Color, Size, Manufacturer)</li>
        <li>Displays multiple Meta Data in the autocomplete list beyond values typed in the textbox (separated by "|").</li>
        <li>Returns a unique key associated with the selected entry (The garment's SKU).</li>
        <li>Exposes extensive Meta Data as the user hovers over possible selections.</li>
    </ul>
</p>
Here is the client script’s contents.
/**
 * demo_client_autocomplete.js
* @NApiVersion 2.1
* @NScriptType ClientScript
*/

/*********************************************************************************
 *********************************************************************************
 FILE: demo_client_autocomplete.js
 *********************************************************************************
 *********************************************************************************/

//@ sourceURL=demo_client_autocomplete.js
define(['N/url', 'N/https'],
    (url, https) => {
        function pageInit(context) {
            $(document).ready(function () {

                let garment_id_field = $('input[name="garment_id"]');
                let garment_category_field = $('input[name="garment_category"]');

                restlet_base_url = url.resolveScript({
                    scriptId: 'customscript_demo_restlet_autocomplete',
                    deploymentId: 'customdeploy_demo_restlet_autocomplete',
                    returnExternalUrl: false
                });

                /**
                 * What's going on here is making functions available in the global scope.
                 * You can see that it also keeps them unique by exposing them inside a
                 * JavaScript namespace called demo_autocomplete_client.
                 */
                demo_autocomplete_client.restletGet = restletGet;
                demo_autocomplete_client.restletPost = restletPost;

                /**
                 * You turn on autocomplete via the autocomplete method associated with
                 * the input[type=text] control.
                 */
                garment_category_field.autocomplete({
                    source: function (request, response) {
                        let type = $('select[name="garment_type"]').val();
                        let color = $('select[name="garment_color"]').val();
                        let size = $('select[name="garment_size"]').val();
                        let manufacturer = $('select[name="garment_manufacturer"]').val();
                        /**
                         * In addition to typed text, you can send additional parameters to act as
                         * filters in the autocomplete responses.
                         */
                        restletGet(
                            'method=autocomplete' +
                            '&category=' + request.term + // <<<=== request term contains the typed text
                            '&type=' + type +
                            '&color=' + color +
                            '&size=' + size +
                            '&manufacturer=' + manufacturer
                            ,
                            function (data) {
                                response(JSON.parse(data));
                            }
                        );
                    },
                    minLength: 3,
                    /**
                     * This event fires on selection of one of the rows in the autocomplete list.
                     * Note the ui.item contains all properties you wish to send back.
                     *
                     * Properties that must be returned are Label and Value.
                     * Label: is what displays in the selectable list.
                     * Value: would typically represent an associated value.
                     */
                    select: function (event, ui) {
                        event.preventDefault();
                        garment_id_field.val(ui.item.value);
                        garment_category_field.val(ui.item.name);
                    },
                    /**
                     * This event fires whenever the user hovers over a possble selection.
                     */
                    focus: function (event, ui) {
                        $('#hover_size').text(ui.item.size);
                        $('#hover_color').text(ui.item.color);
                        $('#hover_type').text(ui.item.type);
                        $('#hover_manufacturer').text(ui.item.manufacturer);
                        $('#hover_sku_heading').show();
                        $('#hover_sku').text(ui.item.sku);
                        event.preventDefault();
                    },
                    close: function (event, ui) {
                        event.preventDefault();
                    },
                    change: function (event, ui) {
                        event.preventDefault();
                    }
                });

                $('input[name="garment_category"]').focus(
                    function () {
                        $('input[name="garment_category"]').val('');
                        $('input[name="garment_id"]').val('');
                    }
                )
            });
        }

        let restlet_base_url;

        function restletGet(parameters, callback) {
            return https.get.promise({
                url: restlet_base_url + '&' + parameters
            })
                .then(response => {
                    callback(response.body);
                })
                .catch(
                    reason => {
                        alert('error reason: ' + reason);
                    }
                )
        }

        function restletPost(parameters, callback) {
            return https.post.promise({
                url: restlet_base_url,
                body: parameters
            })
                .then(response => {
                    callback(response.body);
                })
                .catch(
                    reason => {
                        alert('Error: ' + reason);
                        callback('fail');
                    }
                )
        }

        return {
            pageInit: pageInit
        };
    }
);
var demo_autocomplete_client = {
    restletGet: () => { return false; }
    ,
    restletPost: () => { return false; }
}
I thought I was clever, years ago when I hacked a way to create an Excel worksheet using SuiteScript. I never shared my work in this blog. Fast forward to today. I expected NetSuite would have a method for exporting an Excel worksheet incorporated into native SuiteScript. Unfortunately, this is still not true. But thanks to a very intelligent and energetic NetSuite Support Rep, Ehsan Salimi, I have an example to share.
The code below is written by Ehsan. It is 100% his work, and I take no credit and provide no warranty for it. Feel free to use it as an example, but at your own risk. It comes with no warranty (I have to say that!). After you review his code, I’ll share some thoughts on my version of the same from 3 years ago.
Here is Eshan’s example:
/**
 * @NApiVersion 2.x
 * @NScriptType ScheduledScript
 */
define(['N/search', 'N/file'], function (search, file) {

    /**
     * Base64 encode / decode
     * http://www.webtoolkit.info/
     */
    var Base64 = {
        // private property
        _keyStr: "ABCDEFGHIJKLMNOPQRSTUVWXYZabcdefghijklmnopqrstuvwxyz0123456789+/=",

        // public method for encoding
        encode: function (input) {
            var output = "";
            var chr1, chr2, chr3, enc1, enc2, enc3, enc4;
            var i = 0;

            input = Base64._utf8_encode(input);

            while (i < input.length) {
                chr1 = input.charCodeAt(i++);
                chr2 = input.charCodeAt(i++);
                chr3 = input.charCodeAt(i++);

                enc1 = chr1 >> 2;
                enc2 = ((chr1 & 3) << 4) | (chr2 >> 4);
                enc3 = ((chr2 & 15) << 2) | (chr3 >> 6);
                enc4 = chr3 & 63;

                if (isNaN(chr2)) {
                    enc3 = enc4 = 64;
                } else if (isNaN(chr3)) {
                    enc4 = 64;
                }

                output = output + this._keyStr.charAt(enc1) + this._keyStr.charAt(enc2) + this._keyStr.charAt(enc3) + this._keyStr.charAt(enc4);
            }

            return output;
        },

        // public method for decoding
        decode: function (input) {
            var output = "";
            var chr1, chr2, chr3;
            var enc1, enc2, enc3, enc4;
            var i = 0;

            input = input.replace(/[^A-Za-z0-9\+\/\=]/g, "");

            while (i < input.length) {
                enc1 = this._keyStr.indexOf(input.charAt(i++));
                enc2 = this._keyStr.indexOf(input.charAt(i++));
                enc3 = this._keyStr.indexOf(input.charAt(i++));
                enc4 = this._keyStr.indexOf(input.charAt(i++));

                chr1 = (enc1 << 2) | (enc2 >> 4);
                chr2 = ((enc2 & 15) << 4) | (enc3 >> 2);
                chr3 = ((enc3 & 3) << 6) | enc4;

                output = output + String.fromCharCode(chr1);

                if (enc3 != 64) {
                    output = output + String.fromCharCode(chr2);
                }
                if (enc4 != 64) {
                    output = output + String.fromCharCode(chr3);
                }
            }

            output = Base64._utf8_decode(output);
            return output;
        },

        // private method for UTF-8 encoding
        _utf8_encode: function (string) {
            string = string.replace(/\r\n/g, "\n");
            var utftext = "";

            for (var n = 0; n < string.length; n++) {
                var c = string.charCodeAt(n);

                if (c < 128) {
                    utftext += String.fromCharCode(c);
                } else if ((c > 127) && (c < 2048)) {
                    utftext += String.fromCharCode((c >> 6) | 192);
                    utftext += String.fromCharCode((c & 63) | 128);
                } else {
                    utftext += String.fromCharCode((c >> 12) | 224);
                    utftext += String.fromCharCode(((c >> 6) & 63) | 128);
                    utftext += String.fromCharCode((c & 63) | 128);
                }
            }

            return utftext;
        },

        // private method for UTF-8 decoding
        _utf8_decode: function (utftext) {
            var string = "";
            var i = 0;
            var c = c1 = c2 = 0;

            while (i < utftext.length) {
                c = utftext.charCodeAt(i);

                if (c < 128) {
                    string += String.fromCharCode(c);
                    i++;
                } else if ((c > 191) && (c < 224)) {
                    c2 = utftext.charCodeAt(i + 1);
                    string += String.fromCharCode(((c & 31) << 6) | (c2 & 63));
                    i += 2;
                } else {
                    c2 = utftext.charCodeAt(i + 1);
                    c3 = utftext.charCodeAt(i + 2);
                    string += String.fromCharCode(((c & 15) << 12) | ((c2 & 63) << 6) | (c3 & 63));
                    i += 3;
                }
            }

            return string;
        }
    };

    /**
     * Definition of the Scheduled script trigger point.
     *
     * @param {Object} scriptContext
     * @param {string} scriptContext.type - The context in which the script is executed. It is one of the values from the scriptContext.InvocationType enum.
     * @Since 2015.2
     */
    function execute(scriptContext) {
        var mySearch = search.load({
            id: 'customsearch1783'
        });

        var mySearchResultSet = mySearch.run();
        log.debug('Results...', mySearchResultSet);


        var xmlString = '';
        xmlString =
            '<?xml version="1.0" encoding="UTF-8"?>\n' +
            '<?mso-application progid="Excel.Sheet"?>\n' +
            '<Workbook xmlns="urn:schemas-microsoft-com:office:spreadsheet"\n' +
            ' xmlns:o="urn:schemas-microsoft-com:office:office"\n' +
            ' xmlns:x="urn:schemas-microsoft-com:office:excel"\n' +
            ' xmlns:ss="urn:schemas-microsoft-com:office:spreadsheet"\n' +
            ' xmlns:html="http://www.w3.org/TR/REC-html40">\n' +
            ' <DocumentProperties xmlns="urn:schemas-microsoft-com:office:office">\n' +
            '  <Author>SuiteScript</Author>\n' +
            '  <Created>' + new Date().toISOString() + '</Created>\n' +
            '  <Version>16.00</Version>\n' +
            ' </DocumentProperties>\n' +
            ' <Styles>\n' +
            '  <Style ss:ID="Default" ss:Name="Normal">\n' +
            '   <Alignment ss:Vertical="Bottom"/>\n' +
            '   <Font ss:FontName="Calibri" x:Family="Swiss" ss:Size="11" ss:Color="#000000"/>\n' +
            '  </Style>\n' +
            ' </Styles>\n' +
            ' <Worksheet ss:Name="Sheet1">\n' +
            '  <Table>\n' +
            '   <Row>\n' +
            '    <Cell><Data ss:Type="String">Internal id</Data></Cell>\n' +
            '    <Cell><Data ss:Type="String">Name</Data></Cell>\n' +
            '   </Row>\n';

            mySearchResultSet.each(function (resultObject) {
              var internalid = resultObject.getValue({
                  name: 'internalid'
              });
              log.debug('internal id', internalid);
              var name = resultObject.getText({
                  name: 'entity'
              });
              log.debug('name', name);

              xmlString += '   <Row>\n' +
              '    <Cell><Data ss:Type="String">' + internalid + '</Data></Cell>\n' +
              '    <Cell><Data ss:Type="String">' + name + '</Data></Cell>\n' +
              '   </Row>\n';

              return true;
            });


            xmlString += '  </Table>\n' +
            ' </Worksheet>\n' +
            '</Workbook>';

        // Encode XML string to Base64
        var base64String = Base64.encode(xmlString);

        var date = new Date();

        var fileObj = file.create({
            name: 'Saved Search Result - ' + date.toLocaleDateString() + '.xls',
            fileType: file.Type.EXCEL,
            contents: base64String,
            description: 'This is an XML-based Excel file.',
            folder: 877
        });

        var fileId = fileObj.save();
        log.debug('File ID...', fileId);
    }

    return {
        execute: execute
    };
});
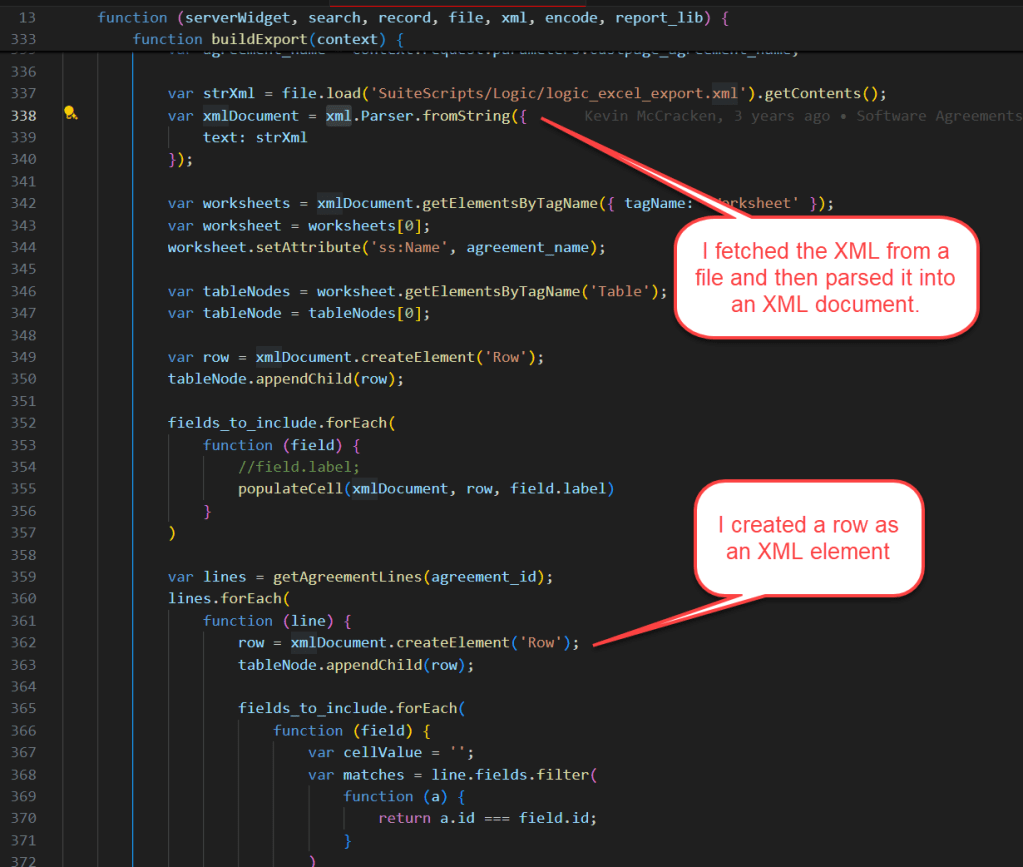
In my version, I used the ‘N/xml’ and ‘N/encode’ modules to replace some of the custom code supplied in Ehsan’s version.
Here, I’m showing that we used the same technique for starting a worksheet. We both copied the header from an existing Excel worksheet. You see it above in his variable named xmlString. In my case, I also copied the row with column headers, so my code only replaced data rows. I did that to also capture the formatting of the column header rows.
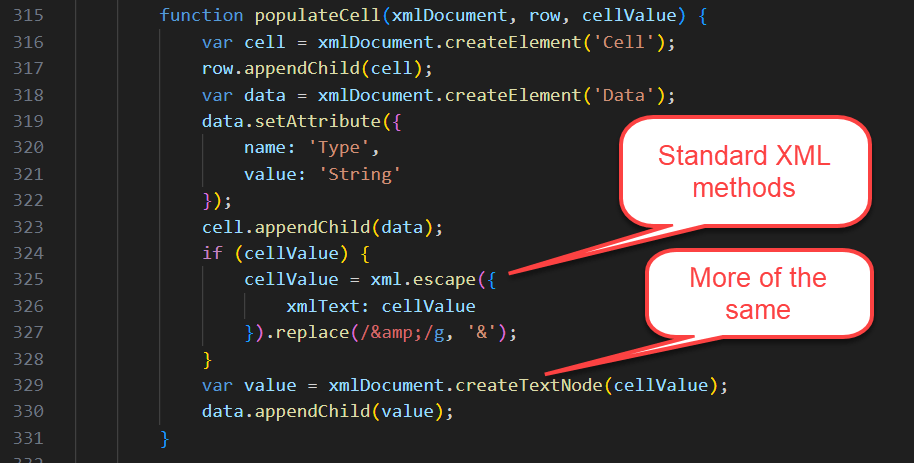
In my version, all XML elements were created and escaped using standard SuiteScript modules.
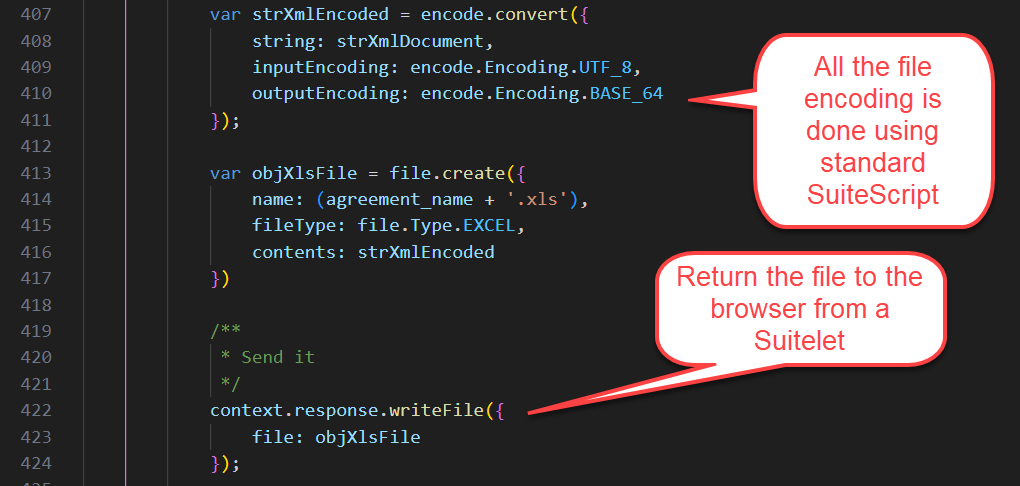
In my version, the file encoding is also done using standard SuiteScript.
I hope this saved you doing the research. As of April 2025, NetSuite does not offer a SuiteScript module that encodes Excel files natively. And if you still need this functionality, here is some help getting started.
This was crazy! After a sandbox refresh, I made a single line change to an array constant. Suddenly my Suitelet began throwing an “Invalid or disabled Suitelet” error. Prior to this change, it ran fine.
I contacted NetSuite for help, but several days later my case auto-closed with no resolution. Here is the fix.
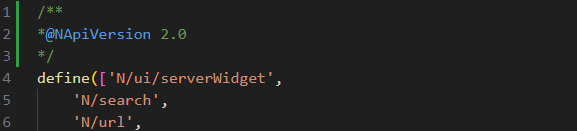
The Suitelet included 2 library files. Suitelets and their included libraries must be the same version of SuiteScript. What I discovered after much trial and error, is that in the past, libraries did not require the @NApiVersion directive. Apparently, now they do! No other changes were required. I added lines 1-3 to the top of the library that was missing the directive.
Just in case you are curious, this was the array constant I changed just before uploading the file to sandbox. I modified the last entry to swap it from “Ignored” to “Group S/N”. That broke the Suitelet. It seemed impossible that my change was the issue. It turns out it was a ticking time bomb. It ran, but only until the script file changed.
If you ever decide to clone custom record types or custom fields, here’s a helpful tip to make sure you got it right.
First, let me point out that using SuiteCloud Developer Framework plugin for vsCode is a great option for cloning any object across instances. An example would be creating a custom record type in your sandbox and then moving it to production. That works great.
In my case, I had two custom record types which needed to function exactly same, but on unique data (same field names and same forms layout). So inbound account’s receivable emails and inbound purchase order emails all live in custom record types. They come in via 2 email plugins, 2 email addresses, and 2 custom record types. Other than that, they are identical. The custom record types, although identical, cannot have the same script IDs and must have their own custom forms.
Once I created the two tables and forms, there were discrepancies. I needed a way to true them up, but retain the uniqueness of their respective script IDs. Here is how I accomplished that.
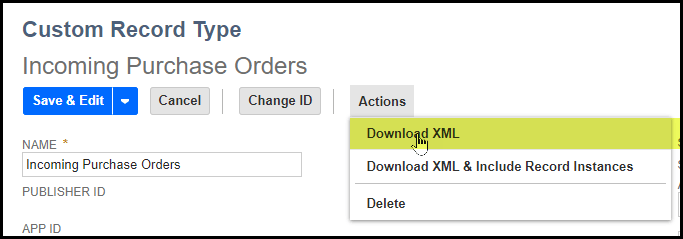
I downloaded each “Object” to XML.
I’ll point out that if you are using SuiteCloud Developer Framework to move this custom record type from sandbox to production or vice versa, you also get the option of moving the data too. That’s handy!
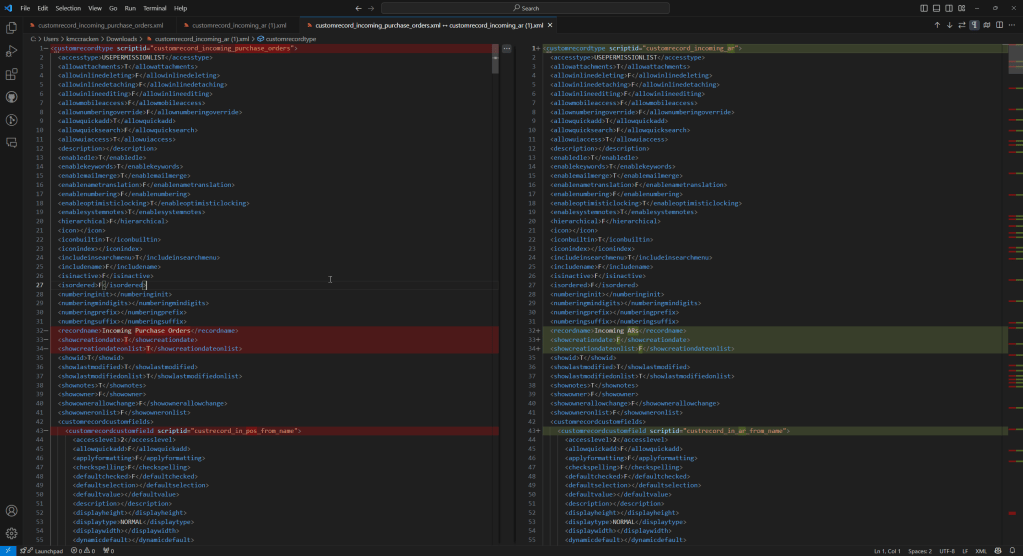
Once you download the two object’s XML representations, you can use any “Diff” program to compare the two files side by side. In my case, I used the compare function in vsCode. WinMerge is another option. I’m sure there are lots of others.
Visually, this makes it easy to see where you’ve missed something regarding your configuration settings, but also maintain the uniqueness of the script IDs.
There are two ways to locate a custom record type in a parent record’s form. One is easy and one requires more work and yields less functionality.
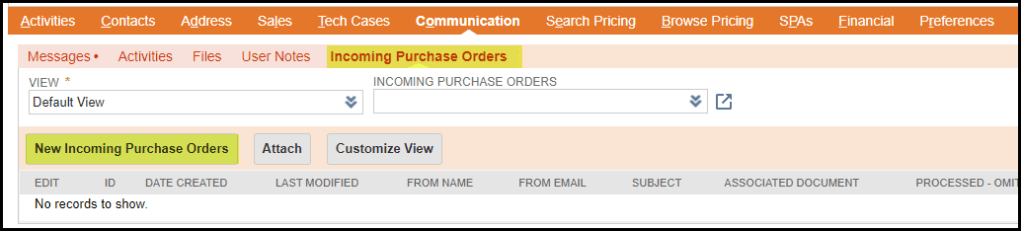
In this scenario, we are dealing with a custom record type called “Incoming Purchase Orders”, emails captured via an email plugin. The custom record type has customer as a parent record. We’d like “Incoming Purchase Orders” sublist to live under the Communications tab of Customers, and be editable.
If you go the route of creating a sublist using Customization >> Forms >> Sublist, creating a saved search, etc., you have the option of placing that sublist in any tab under the customer record. BUT… you lose the “Create New” button. Sublists created this way allow the user to edit records, but not create them.
The easier option is to simply move the sublist created by the parent-child relationship to the desired location under a customer.
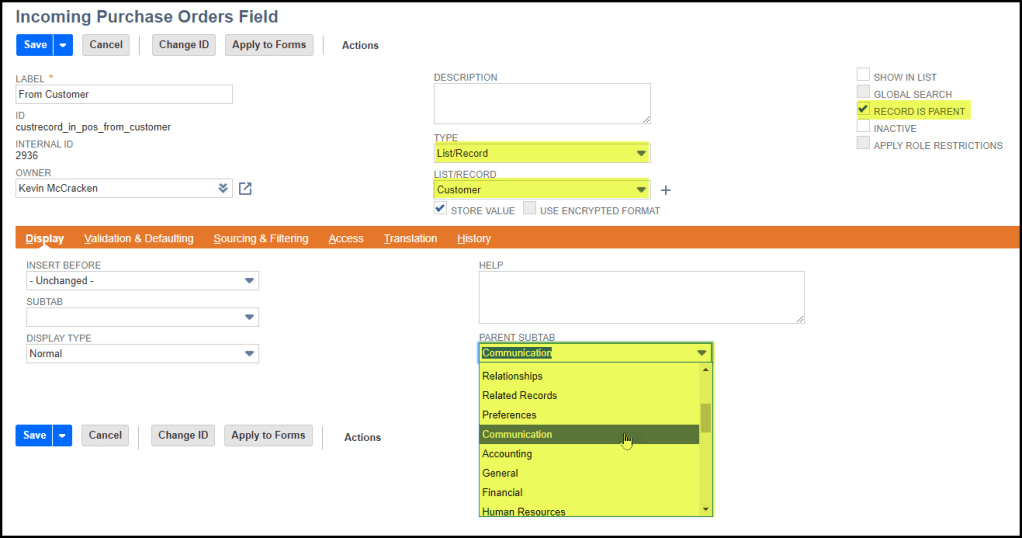
When you create the relationship, in this case “From Customer” defines Customer as the parent of this custom record type “Incoming Purchase Orders”. Make sure to mark it by checking the “Record is Parent”. That automatically makes it show up as a sublist. Then based on the parent’s record type selected in the “List/Record” dropdown, you get the option of placing your sublist wherever you want in the Parent’s forms.
In this case, we are moving it from the Custom tab to the Communication tab where it looks like this.
Most importantly, it retains the “New Incoming Purchase Orders” button. You lose this if you go the long route of creating a sublist based on a saved search.
It’s “Elementary my dear Watson!” I just finished listening to The Sherlockian by Graham Moore on Audible. Loved it!
Release 2024.1 introduced a problem with printed invoices. Suddenly, part numbers were replaced with each item’s internal ID. At first glance I thought this a bad thing, but not so fast.
A field that we’d printed in advanced templates since 2017, displayname, suddenly morphed into an item’s internal ID. Clearly this was not our doing, but something in release 2024.1 had changed. Long story short, I suspect NetSuite is exposing more joined records in advanced templates. After contacting NetSuite, they provided a workaround where I’m swapping item.displayname for item.item.displayname.
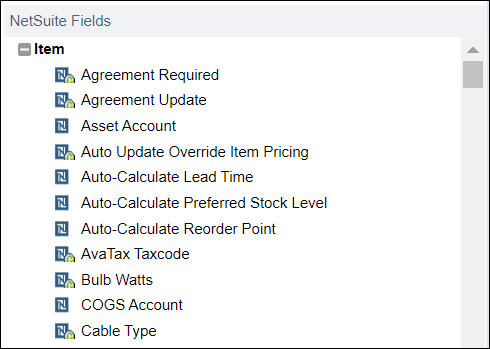
I’ve previously written about how to find fields in advanced templates, but I’ll remind myself (and you) where to check what’s available in your Freemarker templates.
Start by opening your advanced template. It opens in Edit view. You’re looking at Freemarker/HTML code.
Toggle the source code button back to the WYSIWYG view. You won’t keep this view permanently, but here is where you get your list of available joins and fields.
Then click the plus button.
At the bottom of the list are all your joined records.
Expand those to see joins and fields. In my case, I needed record.item.item.
I guess it’s possible item.item.displayname has been there all along and I missed it. My wife tells me she could rearrange the furniture in our entire home and it would take me weeks to notice. Dunno!
This was confusing and cost me a lot of time. A field must be editable and present on the form associated with your CSV import.
If you wish to make a custom field visible to users, but protect against modifications, you can change the display type. Your options are shown below.
If you select any option besides “Normal” you are effectively locking your custom field from UI initiated modifications. Normal is the default.
When you add your custom field to various forms, it propagates that setting. The setting can be modified later, but changing the setting in the definition of the custom field will not change it in the forms. you must actively change it when you reapply to forms.
During your CSV import, you can pick a form. The field must be included in the form and have a display type of “Normal” in order to update using CSV.
With your custom field present and modifiable on the form, it will show up in the list below.
Who would have ever thought the “Display Type” would affect CSV imports? Crazy!
As you architect a custom Suitelet, if you decide to include client-to-server “Restful interactions”, you can accomplish this without a Restlet.
This is the classic model: Suitelet delivers a page to the browser. Without reloading the page, client-side JavaScript interacts with the server to update the page in place. Classic restful behavior.
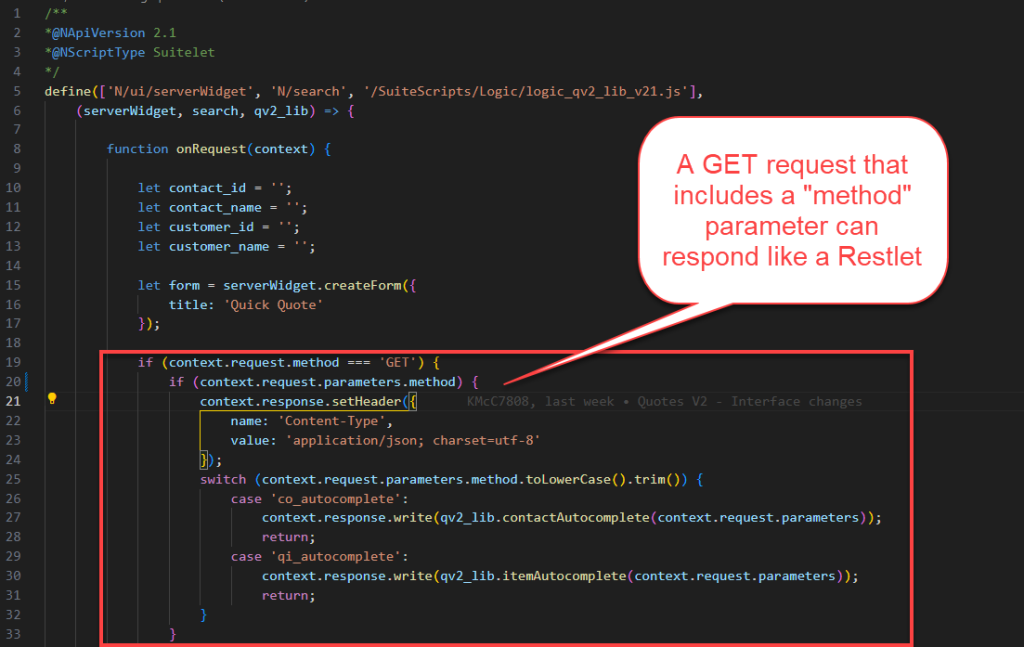
This is the model I’m proposing, A single Suitelet that functions as both the Suitelet and the Restlet.
The trick is to call your Suitelet from a client-side JavaScript AJAX request and include a parameter (in my case it is the “method” parameter) which tells the Suitelet to respond like a Restlet. The server’s response is a Jasonized object delivered to the client as a string. Note below that I’m adding a context.response.setHeader to change the content type to “application/json”.
In the following example, I’m demonstrating a Restful interaction between a jQuery UI auto-complete control and the Suitelet. My example is slightly more complicated than using auto-complete “out of the box”, where I’d pass the method parameter along with a second parameter “term”. I’m also passing some filter criteria in addition to the term which limits responses beyond what is typed in the auto-complete field. Hopefully that makes sense!
The auto-complete field is the one at the bottom under “Select a Contact & Company”. The filters are clearly marked and should be self explanatory. Sorry, I’m overly complicating my example. I’m not going to redo it just to include in this post.
Here is a version of the same client-to-server interaction with Chrome Dev Tools showing the network traffic. It’s lightweight and performant.
Finally, this is client-side JavaScript which calls the Suitelet. The URL might look like this:
The response is an object, “data”, which is NOT a Jasonized string. It can be referenced as-is, as an object, no parsing required.
In summary: I like the idea of having one script to both serve the single-page app and interact with the client-side JavaScript. If you prefer the classic model which includes the Restlet, be my guest. Potato, Po-tot-o, it’s all the same to me!
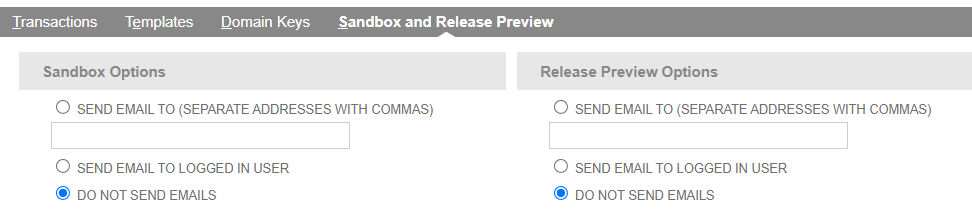
I went looking for a way to turn off emails generated by saved searches and workflows. After a sandbox refresh, all saved searches and workflows which send to customers, employees, or other outside entities continue to run. Instead of emailing the original recipient, they get redirected to the owner of the saved search or workflow. In my case, this meant lots of emails.
What I found… there appears to be only one option. Setup >> Company >> Email Preferences
I’m posting this as a reminder to myself, as well as admitting defeat. I’m asking for help if anyone reading this knows a better way. During my research, I found an article that stated “Programmatic updates to saved searches” is a pending enhancement. I looked at Mass Update, CSV Imports and SuiteScript.
I went as far as writing a program (this runs in debugger) which reads a list of scheduled saved searches and tries to update them. It’s close, but no cigar! If anyone wants to continue with this, go for it! However, if you make progress, please share with the rest of us.
require(['N/search'],
    function (search) {

        /**
         * This example loads a saved search that includes other saved searches that run on a schedule.
         * The important thing is the fields: id and recordtype.
         *
         */
        var mySearch = search.create({
            type: search.Type.SAVED_SEARCH,
            columns: [
                search.createColumn({ name: 'internalid' }),
                search.createColumn({ name: 'id' }),
                search.createColumn({ name: 'recordtype' })
            ],
            filters: [
                ['sendscheduledemails', 'is', true],
                'and',
                ['isinactive', 'is', false]
            ]
        });

        var results = mySearch.run().getRange(0, 1000);
        results.forEach(
            function (result) {
                var scriptid = result.getValue('id');
                var type = result.getValue('recordtype');
                var searchType = search.Type[type.toUpperCase().replace(' ', '_')];
                log.debug('type: ' + type + ', searchType: ' + searchType);

                /**
                 * In order to load a saved search, you must specify a search.Type.
                 * For "standard" types, like "customer", "Item", "transaction", you can translate
                 * the recordtype to an instance of search.Type. This will not work for saved searches
                 * against custom record types.
                 */

                try {
                    if (searchType != undefined) {
                        /**
                         * Once you correct identify and translate the search.Type, you can load the saved search.
                         */
                        log.debug('Attempting to modify: ' + scriptid + ' (' + type.toUpperCase().replace(' ', '_') + ')');

                        var mySearch = search.load({
                            id: scriptid,
                            type: searchType
                        });

                        /**
                         * Unfortunatley, you can make changes to settings without throwing an error.
                         */
                        mySearch.settings.scheduledalert = false;
                        mySearch.settings.triggeredalert = false;

                        /**
                         * AND... you can save the search without throwing an error.
                         */
                        mySearch.save()
                    }
                }
                catch (err) {
                    log.debug('error: ' + err);
                }
            }
        );
    }
);