SuiteScript & SuiteTalk – Cannot Access Sublist Field

This one is obvious, and yet it got me again. You save a sublist field on a transaction. Then you go to read it back and it’s not there. What the heck happened? There never was an error message indicating something went wrong.

Here’s an example event script. It is not a fully working example. It just highlights the problem.

code example

The problem is this. In whatever form you execute your event script, the sublist field you are updating is not exposed. To correct this…

If you are trying to write to the field using SuiteScript. Edit the form where you are running your event script.

Customize Form

Go to the sublist fields tab.

Sublist Fields tab

Make sure the field you are updating is visible in the form. This is set via a checkbox.

For SuiteTalk, make sure when you create your transaction (in this case a sales order) that you are using a form where the field is visible. You must specify the form by its internal ID.

SuiteTalkCustForm

Both of these scenarios result in no error and no action!

Sublist Updates – Performance Issues

After some testing, I found that when updating estimate line items, you’ll want to bulk your requests. Loading and saving the estimates is very timeconsuming. So load the estimate, make all your updates to line items and then save the estimate. This becomes a problem if you are removing a subset of items. Here’s how I accomplished the task. 

  1. My example is in SuiteScript 2.0
  2. I’m removing 3 non-consecutive lines (Lines 1, 2 & 4).
  3. In my example, the lines I wish to remove are not supplied in order.
  4. You must do this in Dynamic mode. If you are unfamiliar with the 2 modes in SuiteScript, standard and dynamic, dynamic mode loads all the sublist items when you load the main (estimate) record.
  5. I’m removing Estimate Lines. Each line gets a line number. All sublists work the same.
  6. SuiteScript 2.0 references line numbers starting with a zero-based index. Note: This differs from SuiteScript 1.0 which is one-based.
  7. DON’T MISS THIS. Loading an estimate (in my environment) takes 4 seconds. Saving the estimates adds another 4 seconds. So I want to load the estimate, remove lines, and then save the updated estimate. This eliminates lots of overhead!!!
  8. When you remove a line, it changes the subsequent line numbers. So remove items from bottom to top in the list! You can ignore this if you are removing all lines. In that case, you can simply loop through all items, repeatedly removing line 0 (or 1 in SuiteScript 1).
  9. I’ve included the save() function, written for both client-side and server-side. Client-side is commented out.
  10. Finally, this example is meant for debugger. It uses require() instead of define().

Here is the code.

Code Example

Here is the code in a form you can cut and paste into debugger.

require([‘N/record’, ‘N/log’],
    function (record, log) {
        // These are the line numbers that we will be deleting ()
        var linesToDelete = [1, 4, 2]; // Notice the order
        // Sort this array in decending order
        sortedLinesToDelete = linesToDelete.sort(function (a, b) { return a < b ? 1 : -1 });
        var currentQuote = record.load({
            type: record.Type.ESTIMATE,
            id: ‘[your transaction internalid goes here]’,
            isDynamic: true
        });
        for (var i = 0; i < sortedLinesToDelete.length; i++) {
            currentQuote.removeLine({
                sublistId: ‘item’,
                line: (sortedLinesToDelete[i] – 1), // SuiteScript 2.0 uses a zero based index!
                ignoreRecalc: true,
            });
        }
        // Server side… no promise. It’s synchronous.
        currentQuote.save();
        log.debug(linesToDelete.length + ‘ items removed’);
        // // Client side, you may want the promise
        // currentQuote.save.promise()
        //     .then(
        //         function () {
        //             log.debug(linesToDelete.length + ‘ items removed’);
        //         }
        //     )
    }
)


Adding a new Item using SuiteScript 2.0

I had this problem where I was attempting to add a new Noninventory for Resale item. The code ran without errors, but the item never showed up. That’s where it got weird.

Code that doesn’t work and doesn’t throw errors is a pain. After beating my head against the wall for more than an hour, I contacted NetSuite support. They gave me great insight into finding the problem. Nonetheless, this really needs to be on their enhancement list. Here is the workaround. Oh… and here is the elusive working example in SuiteScript 2.0 that successfully adds an item.

First, the workaround. On the statement that saves the item, single step into it.

Single Step into Save

It throws an error, which is actually caught and overlooked. In that error in Dev Tools, read the error message (e.message). That error, which is never reported is the key to your issue. It will say something like:

  1. Income account it missing
  2. Expense account is missing
  3. Tax Schedule is missing

Any required field (which is partially controllable by your NetSuite Admins) may show up in this list. If any of them is missing, no error and no new item!

Here is my working example. This example, combined with the debugging technique I gave you above might save you lots of frustration and wasted time.

()h… one more thing. I’ve also included an example of how to set base price on an item. This was also a little tricky.

        require([‘N/record’],
            function (record) {
                var newItem = record.create({
                    type: record.Type.NON_INVENTORY_ITEM,
                    isDynamic: true,
                });
                newItem.setValue({
                    fieldId: ‘itemid’,
                    value: item_name
                });
                newItem.setValue({
                    fieldId: ‘manufacturer’,
                    value: vendor_name
                });
                newItem.setValue({
                    fieldId: ‘salesdescription’,
                    value: description
                });
                newItem.setValue({
                    fieldId: ‘cost’,
                    value: cost
                });
                newItem.setValue({
                    fieldId: ‘incomeaccount’,
                    value: [your integer value here]
                })
                newItem.setValue({
                    fieldId: ‘expenseaccount’,
                    value: [your integer value here]
                })
                newItem.setValue({
                    fieldId: ‘taxschedule’,
                    value: 1
                })
                newItem.setValue({
                    fieldId: ‘pricinggroup’,
                    value: 1
                })
                newItem.selectLine({
                    sublistId: ‘price1’,
                    line: 0
                });
                newItem.setCurrentSublistValue({
                    sublistId: ‘price1’,
                    fieldId: ‘price_1_’,
                    value: listprice
                })
                newItem.commitLine({
                    sublistId: ‘price1’
                })
                var newItemResponse = newItem.save();
                console.log(newItemResponse);
                callback();
            }
        )

Purchasing Tab

SalePricing Tab

SuiteScript Client-Side Debugging in vsCode

Every developer should be doing interactive debugging. Here’s how to debug client-side SuitesScript using vsCode. 

Before continuing on, I’d highly recommend you watch this video by James Quick. It’s worth your time. Thanks James!

James Quick’s video on vsCode debugging

Now that you know what’s possible, let’s get this working with NetSuite. There are several ways to go about it.

  1. Configure vsCode to auto-start Chrome and open the URL that you’d like to debug
  2. Configure vsCode to attach to an already-open page in Chrome

Let’s look at my launch.js file. It defines 2 configurations (methods of starting debugging).

Launch File

Here is where I’d select one of my two configurations to start interactive debugging. You can easily see how these dropdowns match my 2 configurations in my launch.js file.

Choices

Option #1 – “Sandbox Edit” automatically starts Chrome and opens the specific page I’ve called out in the URL parameter of the configuration. Then it matches any JavaScript files in my vsCode workspace (called out in the webRoot parameter) with files of the same name downloaded to the browser.

In this example, logic_comp_common.js lives locally in my
[vsCode workspace root]\Components\Common  folder. This matches the location I’ve set in webRoot parameter. This lets vsCode and Chrome seamlessly match the downloaded version of the code seen by the browser with vsCode’s version of the code saved locally.

Javascript Associations

When the two files match vsCode lets me set stops directly in my workspace copy of logic_comp_client.js.

Launch Example

Option #2 – “Any URL Attach” tells vsCode to attach to an already open web page. In this case, I click the second option in the dropdown before clicking the green “Play” button to start debugging.

But first (don’t ya hate that)… In order to attach, I need to tell Chome to start in debugging mode. I do this in the shortcut where I launch Chrome. Note! The port specified here must match the one in launch.json. 

Chrome Shortcut Properties

In this example, when I try to set a stop in logic_comp_common.js, the breakpoint will not turn bright red like it did in the previous example. The reason: vsCode cannot correctly associate logic_comp_common.js in my workspace with the file downloaded from the server to the browser.

Attach and set stop

This is because the layout of the files in my vsCode workspace does not match the layout of the files on the server.

Folder Layouts

If the folders had matched, this would have worked. However, I can work around this. If I double-click the file under “Loaded Scripts”, it will open a second copy (the browser’s copy) of the file. Note below that logic_comp_common.js appears in two tabs.

Dev Tools Version of the File

In this copy of the logic_comp_common.js, I can set stops and step through code.

Hopefully, I’ve worked through enough examples of how to launch vsCode debugger and how to associate files in your local workspace with files downloaded from server to browser and set stops. Between my notes and the video, you should be successful in doing interactive debugging in vsCode. That’s where I’m headed! Won’t you join me?


SuiteScript 2.0 – N/Search – Formula Columns

What I’m about to share can be found in NetSuite’s documentation. However, like most everything I write about, it was hard to find!

Unless you know the answer, finding this is rough. When you search for “formulatext”, it’s the first article that comes up in SuiteAnswers!

Answer Id: 74736

This is my version of what it says:

Code Example

This search is reading the items table and combining the itemid and displayname into basically one field. It does it in both the filter as well as the results.

FYI… these are bogus part numbers. However, you can see the formula field is correctly labeled and formatted in the results.

Results

Here is that code snippet in case you don’t like typing.

                function setSearchType(exact) {
                    if (exact) return search.Operator.IS;
                    else return search.Operator.CONTAINS;
                }
                var filters = new Array();
                var columns = [
                    search.createColumn({ name: ‘internalid’, label: ‘ID’ }),
                    search.createColumn({
                        name: ‘formulatext1’,
                        formula: [
                            “case”,
                            “when {displayname} != {itemid} then ‘<b>’ || {itemid} || ‘</b><br />’ || {displayname}”,
                            “else {itemid}”,
                            “end”
                        ].join(‘ ‘),
                        label: ‘Name/Disp. Name’ }),
                    //search.createColumn({ name: ‘displayname’, label: ‘Display Name’ }),
                    search.createColumn({ name: ‘description’, label: ‘Description ‘}),
                    search.createColumn({ name: ‘companyname’, label: ‘Vendor’, join: ‘vendor’ }),
                    search.createColumn({ name: ‘baseprice’, label: ‘Base Price’}),
                    search.createColumn({ name: ‘costestimate’, label: ‘Estimated Cost’})
                ];
                if (itemName.length > 0) {
                    filters.push([
                        [‘itemid’, setSearchType(itemNameMatch), itemName],
                        ‘or’,
                        [‘displayname’, setSearchType(itemNameMatch), itemName]
                    ]);
                }
                if (vendorName.length > 0) {
                    if (filters.length > 0) filters.push(‘and’);
                    filters.push(
                        [‘vendor.entityid’, setSearchType(vendorNameMatch), vendorName]
                    )
                }

On-Demand Map/Reduce Parameters

As per my usual post, this is another tricky little gotcha (or should I say gotMe). My problem: A foreground task that rebuilt Item Pricing for a selected customer was timing out. I needed to break it up into chunks and run it in the background as a map/reduce script. In order to do that I had to pass the customer’s ID from a foreground Suitelet to a background map/reduce script.

Note to self: This is super easy, but not super intuitive.

This is a side note. Feel free to skip it.

Why 2 scripts? You probably already know the answer to this or you wouldn’t be reading this post. So “Let me ‘splain. No, there is too much. Let me sum up.” (Inigo Montoya – Princess Bride)

There are different governance rules for foreground and background tasks in NetSuite. Tasks that timeout in the foreground are apportioned more CPU cycles in the background. Map/Reduce is one type of background script that also allows a developer to break up a task into smaller chunks, where each chunk gets its own scope and allotment of CPU cycles. A correctly coded map/reduce script will not time out.

Back to the problem at hand… Drum roll, please! All parameters must be defined with the Script. Below is the Parameters tab under my map/reduce script.

Parameter Definition

It is not intuitive that you need to define parameters here. Keep reading.

Here is the code that runs in the foreground which launches the background map/reduce script. When you read NetSuite’s docs, they show code samples just like this. There is no mention that the parameter must already be defined in the script.

Calling Code Sample

For completeness, here is the code in the map/reduce script which reads the parameter.

Reading the Parameter

If you don’t define the parameter in the called script, all the code works, but the parameter yields a value of NULL in the map/reduce code.

Hopefully, this saves you (and me) time when dealing with passing parameters in the future. Happy coding!

SuiteScript 2.0 – Summary Search on Joined custom record types

NetSuite has voluminous documentation. That’s both good news and bad. I never could find an example of how to summarize a joined field. Perhaps it is out there. Who knows? So… I fiddled with it until it surprized me and worked! The answer turned out to be both intuitive and tricky.

Here’s how this works.

  1. I’ve got a custom table called custom_record_logic_spa_filters
  2. It has a field called custrecord_spa which joins to custom_record_logic_spas.
  3. custrecord_customer then joins with Customers
  4. I want a list of customers.

Search Joins Diagram

Here is the code that rolls up by custrecord_spa and also by Customer.

Code Sample

It would be nice to remove the roll up on custrecord_spa. Unfortunately, you can’t. If you pull that level out, it blows up.

In this case, it was easy enough to roll up a list of customers in code after the search completed.

Here is the code in a form you can cut and paste into your project.

require([‘N/search’, ‘N/log’],
   function (search, log) {
      var mySearch = search.create({
         type: ‘customrecord_logic_spa_filters’,
         columns: [
            search.createColumn({name: ‘custrecord_spa’, summary: search.Summary.GROUP}),
            search.createColumn({name: ‘custrecord_customer’, join: ‘custrecord_spa’, summary: search.Summary.GROUP})
         ],
         filters: []
      });
      var myPages = mySearch.runPaged({ pageSize: 1000 });
      for (var i = 0; i < myPages.pageRanges.length; i++) {
         var myPage = myPages.fetch({ index: i });
         myPage.data.forEach(
            function (result) {
               var spa = result.getText({name: ‘custrecord_spa’, summary: search.Summary.GROUP});
               var customer = result.getValue({name: ‘custrecord_customer’, join: ‘custrecord_spa’, summary: search.Summary.GROUP});
               log.debug(customer);
            }
         )
      }
   }
)

Native NetSuite Components

If you’ve been following me, you know I’ve looked into how best to write reusable components (controls) in NetSuite. I’ve fiddled with React but ultimately landed back in native Suitescript. I needed to document this for myself, so I thought I’d share my notes.

I’ve written several controls. They all follow the set of rules and suffer the same set of restrictions. Here are my notes on native NetSuite components (my way!).

First, here’s what I’m demonstrating, a component that can be added to any NetSuite page. It uses Ajax calls (native client-side SuiteScript) to fetch results. There are no postbacks with this control and it does not save state. It is intended for use in any page that does not require postbacks. My intention is to use it in multiple single-page Suitelets.

Component only

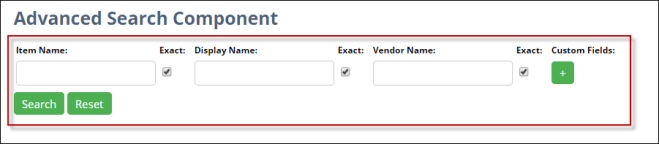
Once this component is rendered in any Suitelet, it offers options for filtering as shown here.

Component screen shot

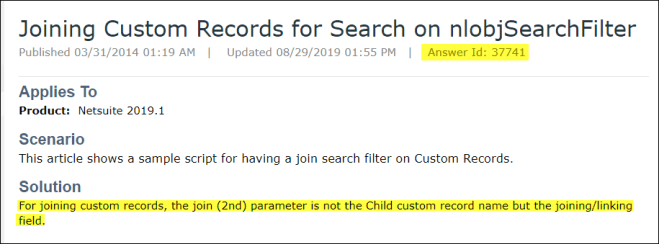
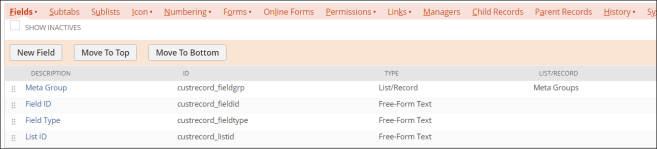
All custom fields (Input Phase, Horsepower, In Stock, etc.) are defined in a custom record type which I maintain. This makes it easy to decide which fields appear in the control and also allows for grouping Metadata to make it easier to find what you’re looking for.

Advanced Search Definitions

To place this “Advanced Search” component in a Suitelet, here’s what that looks like. Searchcomponent is the actual component and searchResults is another native NetSuite INLINEHTML control where the results are rendered. All code to render results is outside the searchComponent. What I’m showing below is server-side Suitelet code that drops the Advanced Search component into a demo Suitelet.

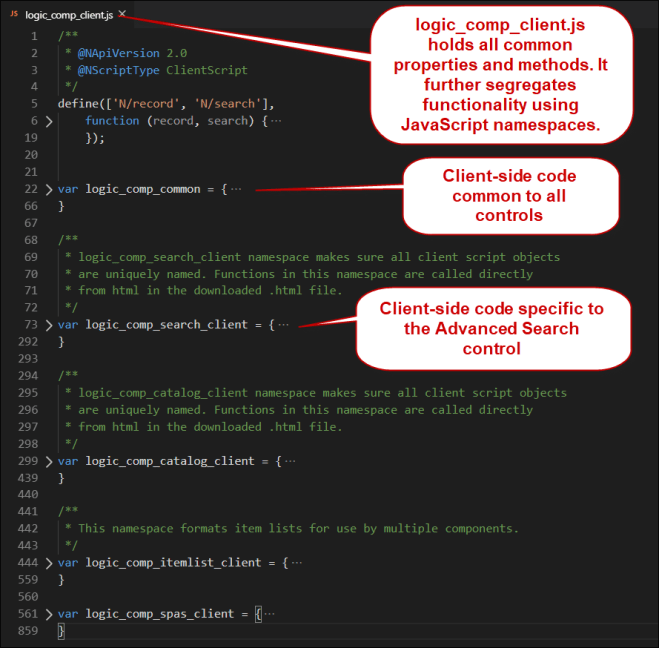
I’m including 2 AMD compliant libraries (line 5 & 6), logic_comp_lib.js (the common component library) and logic_comp_search_lib.js (the Advanced Search component library).

Code to add component

Lines 44-48 is where I’m setting properties on the Advanced Search component and initializing it.

Before we dive into the quirky stuff, here’s how my code is organized. In source control, I organize using folders. In NetSuite file cabinet, everything uploads to the SuiteScripts/Logic folder where all the naming conventions and namespaces come into play.

Folders

The first quirky thing is that we are only allowed to add one client script using the form.clientScriptFileId parameter. To work around that problem, all controls share a common client script but also allow for a second script as a parameter to the control itself. The second script is instance-specific client-side code. In this instance the second script handes rendering results.

Load local script

In search_lib (my Advanced Search component library), here is where the common client script and the 2nd instance-specific script are loaded.

loading client scripts

Client-side code that is specific to the control itself is placed in the common client-side library, logic_comp_client.js.

client-side libraries

Rather than building all my HTML in JavaScript, I’m loading it from a file.

loading html

I’m also bootstrapping data/objects created in server-side code and making them available client-side.

bootstrapped objects

This is the basic layout of my Advanced Search component. It can be combined with other components, like this catalog browsing component.

multiple components

When I was investigating using React to write components like this, I concluded it was complicated and hard to save state. In the end, dropping back to native NetSuite to write components it is also complicated and hard to save state. So I’ve come full circle.

In the end, my choice is native NetSuite. For you React developers, you can decide for yourself which path to take.

Happy coding!

SuiteScript – Joining Custom Record Types

NetSuite has voluminous documentation. That’s great! However, sometimes finding what you need can be rough. Here is a perfect example. 

I needed to join a custom record type to its associated item. Here is the custom record type’s definition.

Custom Table Def

I wanted to show an item’s display name. The trick was not to reference the joined record type (table) in the join property. Instead, reference the field in the custom record where the join was initiated. The joined rec type is called out in that field’s definition (see above).

Code

This makes perfect sense if you think of it this way.  Your custom record type could include multiple fields linking to Items. If you supply “Items” in the “join:” parameter, SuiteScript would be unable to decide which field to join to. 

Here is what you’d expect to code. However, NetSuite reused the “join:” parameter in place of adding a “joinid:”.

Ideal

There is SuiteAnswer that deals with this. It took me FOREVER to find it. FYI… it works the same on search filters and columns.

https://netsuite.custhelp.com/app/answers/detail/a_id/37741

SuiteAnswer

SuiteScript 2.0 – Why use AMD compliant libraries?

In my last post, I asked NetSuite savvy developers not to pummel me with better ways to deal with SuiteScript 2.0 libraries (aka modules). I pointed out that using non-AMD compliant libraries had limitations. So I demonstrated how to get around these limitations. And now, I hope we’re all laughing together as I pummel myself with a better idea.

As programmers, we’ve all got to be similar in that after I finish writing code, I’m happy with it… until I find a better way. Then that old code is JUNK! So let me help you avoid junk after reading my last post.

Why use non-AMD compliant libraries?

Non-AMD compliant libraries can be ones you have no control over or are yours but too unwieldy to convert. Non-AMD libs are implemented as JavaScript namespaces (a concept, not really a construct). JavaScript namespaces are objects. Non-AMD libraries look like this:

var my_non_amd_library = { variables & functions go here };

In my last post, I demonstrated how to reference non-AMD libraries at design time, as well as how to include non-AMD libraries at runtime. If you reference at design time, you are limited to one NAmdConfig.json file per Suitelet. A config file can include multiple libraries, but the combinations of many Suitelets and libraries can leave you with lots of config files. Yuck.

Now it’s time for the pummeling! It’s not that difficult to convert a non-AMD compliant lib to AMD compliance. Let me demonstrate using the example above.

define(function() {
//variables and functions go here
return {
variable1: variable1,
function1: function1
}
}

Once you make those simple changes, you can use the standard method of including your lib. There is no limit to how many libs you can include in your Suitelet. The only issue I ran into was scoping variables that were global in scope within my library/module, but unavailable outside the define() function.

Just to close the loop, you include custom libs/modules in a Suitelet as follows:

/**
*@NApiVersion 2.x
*@NScriptType Suitelet
*/
define([‘N/ui/serverWidget’, ‘./mylib1.js‘, ‘./mlib2.js‘],
    function (serverWidget, lib1, lib2) {

That’s it. Super simple! Just say “No” to junk code!