SuiteScript 2.0 – @NAmdConfig – dynamic entries

Per my most recent blog posts, you’ve probably noticed I’m focusing on reusable components in the NetSuite stack. One of the first problems I hit was dynamically adding multiple non-AMD libraries to a Suitelet. 

For you savvy NetSuite developers, please don’t immediately tell me I’m doing this the hard way. I know I can create an @NAmdConfig JSON that exports multiple libraries. However, that would require a unique @NAmdConfig for practically every page that included multiple components. Ugly!

And yes, I realize I could put all my code for all my controls in one large library.  But I’m the guy who wipes down the sink in public restrooms when I’m done. I want this to be a well-organized codebase. That’s just me.

To that end, here’s how you’d accomplish dynamically loading non-AMD libraries in a SuiteScript 2.0 Suitelet. These next 2 images show code from one Suitelet. In the first image, I’m showing the standard method of importing a non-AMD library. It represents a search control that I’m placing in the page.

Code page 1

In the code below, I’m dynamically importing a second non-AMD library that renders a second component, a catalog browser control.

Code page 2

Here, I’m dissecting the config object. I found this a little confusing at first. Hopefully, this reference helps. It works the same in the *@NAmdConfig ./LogicCompSearchLib.json file and associated library.

Config file explained

I hope this saves you the hours of research that went into these few lines of my code!

SuiteScript 2.0 Client Script Debugging

I recently ran into a problem where I created a Suitelet that downloaded HTML to include in the page. Next, I wanted to add JavaScript. However, when I went to debug the JavaScript in Chrome it threw an error, but the “Sources” tab in Chrome Dev Tools was blank. I saw the red X, but there was no code. Just the X! Here’s how to fix that. 

First, a little background. This is important because this might be the only scenario where you experience this problem. It has to do with JavaScript that is included inline with a <Script> tag.

Why was I bundling my HTML and JavaScript into one file? If you’re not interested, then skip to the end. That’s where you’ll get your answer to how to debug inline JavaScript in Chrome.

My Suitelet fetches a couple of files from NetSuite’s file cabinet.

Here’s a snippet from the Suitelet that adds an inline HTML element to my screen and then fetches 2 files from the file cabinet and injects the contents into the inline element. It saves putting all the HTML in the Suitelet.

Inline HTML Element

To be thorough, here’s the code that actually fetches the HTML prior to pushing it into the form. It is completely irrelevant to the problem at hand.

Load File method

And here’s a snippet from the HTML that I’m injecting into my Suitelet. The only thing of relevance here is the fact that I’m keeping my JavaScript in the same file as the HTML. I wanted to make it easy on myself to find it. And when I’m making changes to HTML and JavaScript, I upload just this one file.

download HTML

And here’s the big reveal…
sourceURL

When you put this comment into your JavaScript, Chrome will associate what’s in the script tag with this file name. Here the “Sources” tab from Chrome’s Dev Tools screen.

Amazing

Now you can find it, set breakpoints, and even see code when something blows up. Amazing!


SuiteScript – Fails to read CSV

This is was amazingly frustrating. I’m calling this a bug. NetSuite… I hope you’re listening. When uploading a file with SuiteTalk, setting the file type to CSV does not make the file a CSV. Unless the file name ends in “.csv”, the file shows as type “Other Binary.” This precludes any script (I only tried SuiteScript 2.0) from reading the contents of the file. File.getReader() and File.iterator() blow up.

My use case: I have a large number of records to upload to the server. In order to make the upload performant, I chose to push them up in a CSV and then kick off a server-side script to actually create the records. The number of records was large enough that the hit the 10 Meg upload limit. So I broke the CSVs into multiples. I set the type to CSV but I did not add “.csv” to the end of the file name. Whoa, that a mistake!

This is my SuiteTalk app written in C# which breaks up and uploads my CSVs.

Code Example CSV

As always… Here’s the code in a form you can cut and paste.

private static void uploadFile(NetSuiteService service, StringBuilder csv, int fileSuffix)
{
Console.WriteLine(“Writing CSV file to ” + path);
System.IO.File.WriteAllText(path, csv.ToString());

string NetSuiteFileName = nsFileName + String.Format(“_{0:000}.csv”, fileSuffix);

Console.WriteLine(“Creating upload file to send to NetSuite”);
File file = new File()
{
attachFrom = FileAttachFrom._computer,
attachFromSpecified = true,
name = NetSuiteFileName,
folder = new RecordRef()
{
internalId = “615990”
,
type = RecordType.folder
,
typeSpecified = true
},
fileType = MediaType._CSV,
fileTypeSpecified = true,
textFileEncoding = TextFileEncoding._utf8,
textFileEncodingSpecified = true,
content = localFileToContents(path)
};

Console.WriteLine(“Uploading file to NetSuite”);
service.tokenPassport = TBAtoken.createTokenPassport();
WriteResponse writeResponse = service.add(file);

if (writeResponse.status.isSuccess)
{
Console.WriteLine(“Success!”);
}
else
{
Console.WriteLine(“Failed”);
foreach (var detail in writeResponse.status.statusDetail)
{
Console.WriteLine(” ” + detail.message);
}
}
}

static byte[] localFileToContents(String sFileName)
{
System.IO.FileStream inFile;
byte[] data;

try
{
inFile = new System.IO.FileStream(sFileName, System.IO.FileMode.Open, System.IO.FileAccess.Read);
data = new Byte[inFile.Length];
long bytesRead = inFile.Read(data, 0, (int) inFile.Length);
inFile.Close();
}
catch (System.Exception exp)
{
// Error creating stream or reading from it.
Console.WriteLine(exp.Message);
return null;
}

return data;
}

SuiteScript 2.0 Joined Search Example

Seriously, I don’t know why this was so difficult, but I could not find a full working example of an ad hoc search written in SuiteScript 2.0 that included a join. Let me give a quick shout-out to Marty Zigman. Thanks for getting me 90% of the way there!

Here’s Marty’s example: http://blog.prolecto.com/2016/10/22/netsuite-suitescript-2-0-search-join-and-summary-example/

I’m a bit stupified by the .run().getRange(0,1000). I was trying to use .run().each() and could not get it to work. I’m not a fan of the for-loop in this case. Whatever!… This works!

Here’s the example. This script lists files in a folder that begin with text of your choosing.

Code Example

And here’s the code so that you can easily copy it.

/**
*@NApiVersion 2.x
*@NScriptType ScheduledScript
*/
define([‘N/search’, ‘N/log’],
    function (search, log) {
        function execute(context) {
            var mySearch = search.create({
                type: search.Type.FOLDER,
                columns: [
                    search.createColumn({
                        name: ‘internalid’,
                        join: ‘file’
                    }),
                    search.createColumn({
                        name: ‘name’,
                        join: ‘file’
                    }),
                ],
                filters: [
                    search.createFilter(
                        {
                            name: ‘name’,
                            operator: search.Operator.IS,
                            values: [‘Your folder name here’]
                        }
                    ),
                    search.createFilter(
                        {
                            name: ‘name’,
                            join: ‘file’,
                            operator: search.Operator.STARTSWITH,
                            values: [‘Your file name here’]
                        }
                    ),
                ]
            });
            var result = mySearch.run().getRange(0, 1000);
            var ids = new Array();
            var names = new Array();
            for (var i = 0; i < result.length; i++) {
                ids.push(result[i].getValue({ name: ‘internalid’, join: ‘file’ }));
                names.push(result[i].getValue({ name: ‘name’, join: ‘file’ }));
            }
            log.debug(‘ids’, ids.join(‘,’));
            log.debug(‘names’, names.join(‘,’));
            return true;
        }
        return {
            execute: execute
        };
    })

Auto-Saving Search Results Locally

If you don’t want to set up an FTP server and you do want to save saved search results locally, read on. 

Here are the steps:

  1. Create a saved search that returns less than 10,000 records or 5 Megs. That’s the limit when emailing results.
  2. Set your saved search to send to a recipient with Outlook running on a computer in your network. Sorry… this won’t work with an Exchange rule.
    Email Recipients
  3. Set the email to go out on whatever frequency you like.
    Schedule
  4. Customize the email so that you can identify it when it arrives in outlook as the email you’d like to save attachments.
    Customize
  5. Check out this link to install a macro that runs in Outlook that downloads attachments.
    https://community.spiceworks.com/scripts/show/361-auto-save-attachments-to-folder
    GetTheCode
  6. On the Outlook client that will receive the email from NetSuite, go to
    File >> Options >> Customize Ribbon
    Check the Developer tab
    Developer Tab
  7. Unfortunately, you’ll need to enable all macros.
    Enable Macros
  8. Open Macros by clicking “Visual Basic Editor”
    Open Macros
  9. Paste in the VB code you downloaded in step 5.  You must paste it into the “ThisOutlookSession” object in the left nav.

    Note that I’ve set up my macro to download attachments on any incoming email that has a subject of “Exported ITEMS.” I’m saving the attachment to a network folder. Don’t miss the note to add make sure you have an ending backslash on the path!
    PasteVBcode

  10. Once you close and save this macro, close and re-open Outlook.
  11. To test, I simply ran my saved search. Emailed it to myself using the Email icon on the search results. When the email arrived, I changed the subject to “Exported ITEMS” and forwarded it to myself. I checked the network folder and my search results were there.
  12. The next step for me would be to create a job in my SQL server to auto-import the results into a table in my database.


NetSuite Performance – Client Scripts

I’ve been in discussions with NetSuite about our system’s performance. I’ve previously written several posts on this topic. This go-round the issue of what constitutes “client time” was our focus. We’ve seen erratic client-times on a small percentage of production transactions. I didn’t understand how this could be and speculated on a reason.

First – NetSuite support has been very helpful. I contacted them because although our response times are mostly reasonable, we have a percentage that is not. I reported this and gently pushed back regarding the responsiveness of a shared (SaaS) system between multiple customers (tenants). When the system gets busy, everyone’s response times elongate.

I watched as server time directly correlated with overall response times. As NetSuite’s server time rose, so rose overall response time.

While looking at the numbers, my NetSuite support rep noticed that client time also had some erratic responses. We wanted to know why. I suspected that a popup in my client script might be causing the variance. So I did a little experiment.

I logged into our sandbox on a day when nobody was using it. I added a popup to my client script in the BeforeSave function. Then I opened and saved 10 invoices. Each time, I waited 30 seconds to close the popup.

Next, I removed the popup from my script.

Without closing the original invoices, I clicked edit on all 10 and saved them again one-at-a-time. Here are my 10 transactions in the order I saved them. The first 10 have the popup and the second 10 do not. I pulled these stats from the APM Page Summary and exported them to Excel.

Exported APM Stats

First, total server time only exceeded 30 seconds once, the very first time I clicked save. This indicates to me that the stats are factoring out time spent waiting on an operator to close a popup. That’s awesome! Oh… and that answers to my original question.

Next, client time is very consistent. This is exactly what I’d expected. When a transaction’s total time elongates, it correlates closely with server time. That’s easy to see here.

I’ve split out SuiteScript and Workflow time because I’ve written about this other blog posts. Those two times are included in Server time. One thing to note here is that as server time grows, it can affect both SuiteScript and Workflow. They run on that same server that’s gotten busy with somebody else’s stuff!

So the question remains, why are client times on production transactions varying. My NetSuite support rep is speculating this is caused by browser plug-ins. I’ll need to do more research to validate that theory. However, that’ll need to wait for another blog post.

How to SuiteTalk your Sandbox

Over the two and a half years that I’ve been writing SuiteTalk, I’ve hit about every problem imaginable connecting SuiteTalk to my sandbox. I’m afraid if I started listing them, it would only frustrate me further. So I’m just going to give myself a comprehensive cheat sheet. And, I’m inviting you to cheat off my cheat sheet. Why not?

I didn’t think that I needed to recreate my integration and access token each time I refreshed my sandbox, but as of publishing this post, I did. Here is a complete checklist so that next time I can save lots of time.

1. Create a new Integration: Setup >> Integrations >> Manage Integrations >> New

New Integartion

2. When you click Save, record the following. You’ll only see it once.

Integration Details

3. Start a notepad file and paste in the details. You’ll need to save this somewhere where you can find it again.

Notepad V1

4. Create an Access Token: Setup >> Users/Roles >> Access Tokens >> New

Access Token Create

5. When you hit Save, record the details. You’ll only see it once.

Access Token Details

6. Put it in the same notepad file you created with the integration.

Notepad V2

7. Save these in your code along with your account id. In this case, I’m connecting to the sandbox, so I add “_SB1” to my sandbox account.

Save as Constants in Code

These constants get used when creating your token. I’ve written other posts on this.  See those for a copy of this code.

Create Token

8. Edit your web Reference URL to include your account number.

Web Reference Name

Hit F4 to view properties.

Web Reference Properties

9. When you run your application, if you are using the same DataCenterAwareNetSuiteService class that I use, then you’ll see the following. It is a combination of the URL you bind your Visual Studio project to and the data center agnostic URL.

Split URL

To understand where this URL comes from, see line 11 above.

FYI… I’m deleting this integration and access token. You’ll need to get your own. Hope this saves us both some time in the future. I’ve wasted enough time on this for both of us!


React vs NetSuite Native

A couple of days ago I set out to see if React in a NetSuite page was a good idea. My conclusion, NO. I guess you can stop reading now.

Seriously, there are good reasons for using React. However, managing the back and forth of server-side and client-side became more trouble than it was worth. The NetSuite native code was much simpler and more easily maintained.

If you check out my last post and compare the code, I think you’ll find this much improved. Also, this code picks up where the last example left off, it actually hits the SuiteCommerce Advanced API and delivers results.

Programmer’s note: I simply adapted my previous example. All references to React in file names remain. I’m sure you can get past that. 

Here’s the Suitelet we are building.

SuiteletScreen

The Suitelet code…

SuiteletCode.png

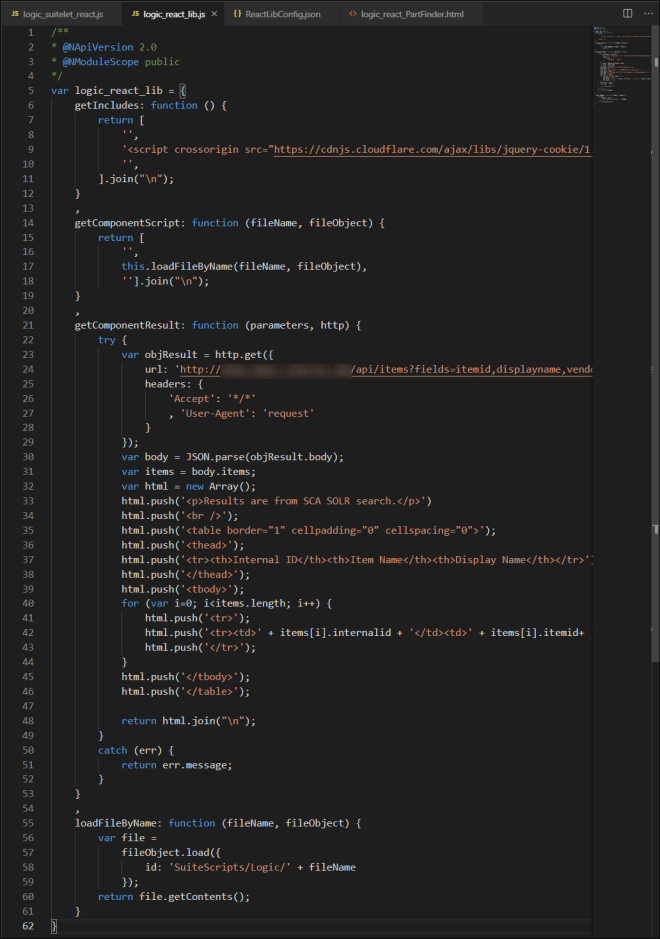
The non-AMD library file. I’m leveraging jquery-cookie to save client-side state.

NonAMDlibraryFile

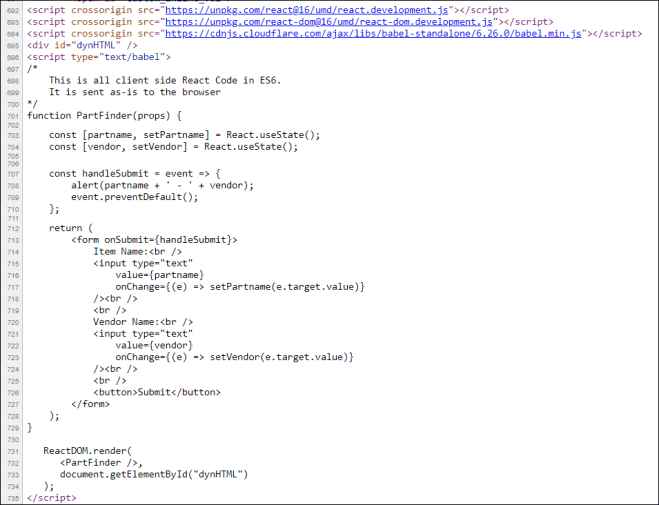
This file contains client-side HTML and JavaScript which is simply fetched and delivered to the browser by the loadFileByName method in the above library.

PartFinder

You’ll need some method to save state. I’ve chosen cookies since it was easy!

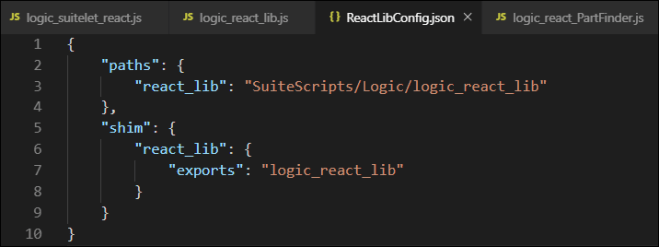
And finally, you’ll need the ReactLibConfig.json file, which I’ve included in the previous post. Don’t forget it!

Here is the code in a format you can easily cut and paste.

/**
*@NApiVersion 2.x
*@NScriptType Suitelet
*@NAmdConfig ./ReactLibConfig.json
*/
define([‘N/ui/serverWidget’, ‘N/file’, ‘N/http’, ‘react_lib’],
    function (serverWidget, file, http, react_lib) {
        function onRequest(context) {
            // Only process GET and POST requests. Ignore PUT and DELETE
            if (context.request.method != ‘GET’ && context.request.method != ‘POST’) return;
            // Add a form
            var form = serverWidget.createForm({
                title: ‘Non-React Suitelet Demo’
            });
            // Add an inline HTML field
            var field = form.addField({
                id: ‘custom_inline’,
                type: serverWidget.FieldType.INLINEHTML,
                label: ‘Inline’
            });
            /*****************************************
            ***   GET REQUEST
            ******************************************/
            if (context.request.method === ‘GET’) {
                field.defaultValue = react_lib.getIncludes() +
                    react_lib.getComponentScript(‘logic_react_PartFinder.html’, file);
            }
            /*****************************************
            ***   POST REQUEST
            ******************************************/
           else if (context.request.method == ‘POST’) {
                var parameters = context.request.parameters;
                field.defaultValue = react_lib.getIncludes() +
                    react_lib.getComponentScript(‘logic_react_PartFinder.html’, file) +
                    react_lib.getComponentResult(parameters, http);
            }
            form.addSubmitButton({
                label: ‘Submit’
            });
            context.response.writePage(form);
        }
        return {
            onRequest: onRequest
        };
    }
);
/**
* @NApiVersion 2.0
* @NModuleScope public
*/
var logic_react_lib = {
    getIncludes: function () {
        return [
            ”,
            ”,
            ”,
        ].join(“\n”);
    }
    ,
    getComponentScript: function (fileName, fileObject) {
        return [
            ”,
            this.loadFileByName(fileName, fileObject),
            ”].join(“\n”);
    }
    ,
    getComponentResult: function (parameters, http) {
        try {
            var objResult = http.get({
                headers: {
                    ‘Accept’: ‘*/*’
                    , ‘User-Agent’: ‘request’
                }
            });
            var body = JSON.parse(objResult.body);
            var items = body.items;
            var html = new Array();
            html.push(‘<p>Results are from SCA SOLR search.</p>’)
            html.push(‘<br />’);
            html.push(‘<table border=”1″ cellpadding=”0″ cellspacing=”0″>’);
            html.push(‘<thead>’);
            html.push(‘<tr><th>Internal ID</th><th>Item Name</th><th>Display Name</th></tr>’);
            html.push(‘</thead>’);
            html.push(‘<tbody>’);
            for (var i=0; i<items.length; i++) {
                html.push(‘<tr>’);
                html.push(‘<tr><td>’ + items[i].internalid + ‘</td><td>’ + items[i].itemid+ ‘</td><td>’ + items[i].displayname + ‘</td></tr>’);
                html.push(‘</tr>’);
            }
            html.push(‘</tbody>’);
            html.push(‘</table>’);
            return html.join(“\n”);
        }
        catch (err) {
            return err.message;
        }
    }
    ,
    loadFileByName: function (fileName, fileObject) {
        var file =
            fileObject.load({
                id: ‘SuiteScripts/Logic/’ + fileName
            });
        return file.getContents();
    }
}


    var PartFinder = {
        partName: null
        ,
        vendorName: null
        ,
        SaveState: function() {
            jQuery.cookie(‘PartFinder.partName’, this.partName);
            jQuery.cookie(‘PartFinder.vendorName’, this.vendorName);
        }
    }
    // Save state in cookies on form submit
    jQuery(‘form’).submit(
        function() {
            PartFinder.SaveState();
        }
    );
    // Restore state from cookies on form reload from server
    jQuery(document).ready(
        function() {
            PartFinder.partName = jQuery.cookie(‘PartFinder.partName’);
            PartFinder.vendorName = jQuery.cookie(‘PartFinder.vendorName’);
            jQuery(‘#partName’).val(PartFinder.partName);
            jQuery(‘#vendorName’).val(PartFinder.vendorName);
        }
    );
<label for=”partName”>Part Name:</label><br />
<input type=”text”
    id=”partName”
    name=”partName”
    onchange=”PartFinder.partName = this.value;” /><br />
<br />
<label for=”vendorName”>Vendor Name:</label><br />
<input type=”text”
    id=”vendorName”
    name=”vendorName”
    onchange=”PartFinder.vendorName = this.value;” /><br />
<br />

Using React in a NetSuite Suitelet

I’m interested in reusable client-side components in NetSuite. React seems to be a very popular non-framework (It’s a JavaScript library… Everybody knows that). I put together this example for myself and thought I’d share it. 

In this exercise, I’m going to write in SuiteScript 2.0. I need the practice! I’ll split up the code into separate files that isolate functionality.

Let’s pretend I’m going to build a library of React components and include them in Suitelets. In my example, I’m serving a component called PartFinder. It doesn’t actually do anything, but imagine it calling the SuiteCommerce Advanced SOLR search engine to find parts based on SCA’s facets (attributes like height, width, weight, vendor, color, price, etc). If you skip ahead to the second to the last image, you’ll see what the component actually looks like.

Imagine being able to drop this component into any Suitelet or add it to existing NetSuite pages as needed with just a couple of lines of code.

Here’s my schematic.

MovingParts

There are 4 files that make up this example. The logic_react_other(s).js represent other React components.

  1. logic_suitelet_react.js – This creates a page, adds a form. In the form it adds an inline HTML element which consists of several parts:
    1. The included react and babel libraries required by React.
    2. A div element with an id of dynHTML. This is where the React component is rendered.
    3. All the code to replace dynHTML with the server-built HTML & JavaScript to show a component called PartFinder.

logic_suitelet_react.js

2. A non-AMD compliant library that serves React components along with supporting HTML & JavaScript. It’s the one-stop-shop for React.

logic_react_lib.js

3. A config file which is required for non-AMD compliant libraries.

ReactLibConfig

4. A static file which is the React PartFinder component. This could live in logic_react_lib.js, but I chose to split it out. Nice and tidy!

logic_react_PartFinder

This is what the component looks like in the rendered Suitelet.

RenderedSuitelet

This is the actual HTML and JavaScript you see when you inspect the page at the client.

ReactDOM

And here is my example code in a format you can cut and paste into your IDE. Use this at your own peril (my attorney made me say that!).

/**
*@NApiVersion 2.x
*@NScriptType Suitelet
*@NAmdConfig ./ReactLibConfig.json
*/
define([‘N/ui/serverWidget’, ‘N/file’, ‘react_lib’],
    function (serverWidget, file, react_lib) {
        function onRequest(context) {
            if (context.request.method === ‘GET’) {
                // Add a form
                var form = serverWidget.createForm({
                    title: ‘React Suitelet Demo’
                });
                // Add an inline HTML field
                var field = form.addField({
                    id: ‘custom_inline’,
                    type: serverWidget.FieldType.INLINEHTML,
                    label: ‘Inline’
                });
                // Add the html
                field.defaultValue = react_lib.getReactIncludes() + 
                    ‘<div id=”dynHTML” />’ +
                    react_lib.getComponentScript(‘PartFinder’, ‘dynHTML’, file);
                context.response.writePage(form);
            }
        }
        return {
            onRequest: onRequest
        };
    }
);
/**
* @NApiVersion 2.0
* @NModuleScope public
*/
var logic_react_lib = {
    getReactIncludes: function() {
        return [
                ”,
                ”,
                ”,
                ”,
                ”,
            ].join(“\n”);
    }
    ,
    getComponentScript: function(componentName, tagName, file) {
        switch (componentName) {
            case ‘PartFinder’:
                return [
                    ”,
                    ”,
                    this.PartFinder(file),
                    ‘   ReactDOM.render(‘,
                    ‘      ,’,
                    ‘      document.getElementById(“{tagName}”)’.replace(‘{tagName}’, tagName),
                    ‘   );’,
                    ”,
                    ”].join(“\n”);
            break;
        }
    }
    ,
    PartFinder: function(file) {
        var fileObj =
            file.load({
                id: ‘SuiteScripts/Logic/logic_react_PartFinder.js’
            });
        return fileObj.getContents();
    }
}
{
    “paths”: {
        “react_lib”: “SuiteScripts/Logic/logic_react_lib”
    },
    “shim”: {
        “react_lib”: {
            “exports”: “logic_react_lib”
        }
    }
}
/*
    This is all client side React Code in ES6.
    It is delivered as-is to the browser
*/
function PartFinder(props) {
    const [partname, setPartname] = React.useState();
    const [vendor, setVendor] = React.useState();
    const handleSubmit = event => {
        alert(partname + ‘ – ‘ + vendor);
        event.preventDefault();
    };
    return (
        <form onSubmit={handleSubmit}>
            Item Name:<br />
            <input type=”text”
                value={partname}
                onChange={(e) => setPartname(e.target.value)}
            /><br />
            <br />
            Vendor Name:<br />
            <input type=”text”
                value={vendor}
                onChange={(e) => setVendor(e.target.value)}
            /><br />
            <br />
            <button>Submit</button>
        </form>
    );
}

VSCode & NetSuite-Sync breaks with Release Preview 2019.2

If you use Visual Studio Code and NetSuite-Sync and also have a Release Preview instance of NetSuite, you could fall down this same rabbit hole I just climbed out of. Beware!

Note: Here is my original article regarding VSCode & NetSuite-Sync

This morning, I made some changes to VSCode and noticed NetSuite-Sync was broken. So I quickly reinstalled. This has happened before and it only takes about 5 minutes to reinstall. However, it didn’t fix anything.

When you run the setup command, “ns -g”, to provide credentials to NetSuite-Sync, it creates a NetSuiteConfig.js file. During the prompts, you are asked to supply a role from a list of all your NetSuite roles across all instances of NetSuite, including your Release Preview. The role you select alters what you see below. This config file was used with a test instance of NetSuite which is long gone.

NetSuiteConfig

“account” : “[your account number]”,
“role”: “[gets the ID of the role you select]”,
“endpoint”: “[your account number]…”

Note: The account and endpoint now use the new datacenter agnostic versions. This example is old!

ns -g… If I selected my administrator role associated with our Release Preview instance of NetSuite, I’d get…

“account”: “[my account number]_RP“,
“role”: “3”,
“endpoint”: “[my account number]-rp…”

This worked. However, sandbox, which added _SB and -sb and my standard production Administrator role, which added no suffixes, both failed.

The only solution was to pick another role that was not an Administrator role. Only Administrator roles exist in our Release Preview copy of NetSuite. So a non-Admin role ended the confusion.

The problem was a routing issue on NetSuite’s side. I’m simply offering a workaround.